|
NOTICE
ADA Best Practices Tool Kit for State and Local Governments
Appendices 1 and 2
ADA Accessibility Survey
Forms and Instructions
A. About Appendices 1 and 2
Reviewing programs and facilities for accessibility is one of the most effective
ways for state and local governments to ensure that they are complying with the
Americans with Disabilities Act (ADA). The survey forms in Appendix 1 of this
Tool Kit and the survey instructions in Appendix 2 are resources that will assist
you in conducting surveys and identifying architectural barriers to access. The
materials in Appendices 1 and 2 guide surveyors – even those with little or no
knowledge of accessibility or experience surveying – through the process of
surveying elements in a step-by-step manner while explaining common sources
of confusion along the way.
The survey forms in Appendix 1 serve as the foundation of the accessibility
survey. The forms tell you what information to collect during the survey and
provide a place for you to record that information. Consisting of a series of
yes/no questions, the survey forms are designed to make identifying architectural
barriers easy because the questions are formulated so that responding “no”
(circling “N” on the form) indicates a barrier.
The survey forms contain some questions and terms that people unfamiliar with
accessibility requirements or surveying might not fully understand. When that
occurs, surveyors need to refer to the survey instructions in Appendix 2. The
survey instructions, which include illustrations and explanations, are intended to
be used in tandem with the survey forms. Each question on the survey forms
has a number in the left-hand column, and that number corresponds to an
explanation in the survey instructions. Surveyors should refer to the instructions
the first time they use a form and as often as needed to make sure they are
taking the required measurements and answering the questions correctly.
These forms and instructions are intended to help you identify many of the most
common architectural barriers to access for people with disabilities. They will not
teach you to identify all architectural barriers to access. To identify all
architectural barriers, you must refer to one of the applicable design standards –
either the ADA Standards for Accessible Design (excluding the elevator
exception contained in § 4.1.3(5) of the Standards) or the Uniform Federal
Accessibility Standards – and survey for compliance with each of the applicable requirements. The survey materials included in this Tool Kit are based on the
requirements in the ADA Standards.
B. What does an accessibility survey entail?
The purpose of an accessibility survey is to determine whether or not a facility, or
the component parts of a facility, have barriers to access by people with a variety
of disabilities. During an accessibility survey, surveyors assess the current
conditions of the facility to identify barriers. The forms and instructions contained
in Appendices 1 and 2 will guide surveyors through this process, which generally
entails:
- identifying the features at the facility that need to be measured;
- determining which form needs to be completed in order to survey a
feature;
- measuring all of the features that impact accessibility using proper
measurement devices and techniques;
- accurately answering the questions on the survey forms based on the
measurements taken and recording those measurements; and
- taking photographs of the surveyed features, including, when possible, the
measurements obtained on measuring tapes and digital levels.
C. Who should conduct the survey?
While it is possible for a single individual to survey facilities for accessibility, most
people find it easier to conduct surveys while working in teams of two or three. A
team approach can be more efficient because it allows team members to assume
different roles. For example, one surveyor can take notes and complete forms
while another surveyor is obtaining measurements and taking photos. If the
survey is conducted by a three-person team, the third team member can take the
photographs or read aloud the survey instructions in Appendix 2.
Like the director of a movie, the person filling out the survey forms generally
leads the accessibility survey, which should proceed in the same order as the
questions appear on the form. To make sure all questions are answered, the
surveyor taking notes should read the question out loud so that the surveyor
taking measurements will know what data is needed. Then the surveyor taking
measurements can check the survey instructions to see how the measurement should be taken, obtain the measurement, and announce it to the note-taker,
who can then record the data on the form.
The note-taking role and the measurement-taking role require different skills.
The person recording data on the survey form needs to be detail conscious,
ensuring that all the questions are answered, all the data is recorded accurately,
and all the answers are legible. Taking measurements, on the other hand, can
be more physically demanding than taking notes because it requires frequent
stretching, bending, and stooping. In addition, the person taking photographs
needs to know how to use the camera and be able to take clear photographs.
When assembling a survey team, it is helpful to match these different skills to the
relative strengths of the team members.
Being familiar with the contents of the survey forms and instructions is the best
way to ensure that the survey proceeds smoothly. Surveyors will naturally gain
familiarity with the materials by going out and surveying with them, but it is a
good idea to review the forms and instructions before conducting the survey.
Knowledge of the materials will enable the surveyors to quickly establish a good
pace and rhythm for the survey.
D. What tools are needed to conduct a survey and how do you
use them?
Now that you know how team members should work together, you need to gather
your “tools of the trade.” The following are the standard tools that the Civil Rights
Division uses in conducting its surveys under Project Civic Access:
- a metal measuring tape that is at least 25-feet long;
- a two-foot long electronic (digital) level;
- a digital camera (one with at least three megapixels of resolution with a
zoom feature can be used to photograph measurements on tape
measures and digital levels); and
- a pressure gauge.
1. Measuring Tape
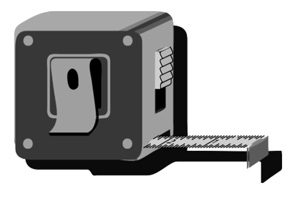 A metal measuring tape is an essential tool for a
successful survey because many of the
accessibility requirements concern the width, height, or depth of various features. A metal measuring tape is an essential tool for a
successful survey because many of the
accessibility requirements concern the width, height, or depth of various features.
A measuring tape will make a good surveying instrument if it has the following
characteristics: it is metal, which is important for durability; it is 25- to 50-feet
long, which is necessary because surveyors will often have to measure long
distances; and it is easy to read, which will help ensure that the surveyors report
accurate data. You will generally not need to measure dimensions in increments
of less than ¼ inch.
2. Electronic (Digital) Level
The slope of a curb ramp or a walkway can make or break its accessibility.
People who use wheelchairs, walkers, and other mobility devices cannot safely
use a curb ramp, walkway, or ramp that is too steep. The most effective and
efficient way to measure the slope of a walkway is to use a two-foot long
electronic (digital) level.
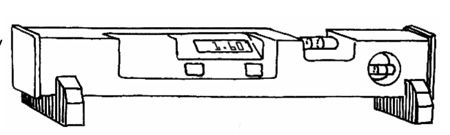 Digital levels are relatively
inexpensive, easy to use,
and extremely accurate if
you read and follow the
instructions provided by
the manufacturer. For the digital level to perform accurately, you must calibrate it
at the beginning of each day before using it to measure any slopes and recalibrate
it before using it again if you drop it. Calibrating a digital level is usually
simple, taking less than a minute once you read the manufacturer’s instructions. Digital levels are relatively
inexpensive, easy to use,
and extremely accurate if
you read and follow the
instructions provided by
the manufacturer. For the digital level to perform accurately, you must calibrate it
at the beginning of each day before using it to measure any slopes and recalibrate
it before using it again if you drop it. Calibrating a digital level is usually
simple, taking less than a minute once you read the manufacturer’s instructions.
Helpful Tips for
Using a Digital Level
- Don’t assume you can tell if a running slope or cross slope is too
steep without measuring. Even experts can misjudge how steep a
running slope or cross slope is if they do not use a level.
- Make sure there are no pebbles or other debris under your level when
you measure slopes and cross slopes. A small pebble or debris under
a level can cause your slope measurement to be inaccurate.
- Electronic levels typically show measurements in three different ways:
percentages (%), degrees (°), and ratios (1:8). It is important to keep
your level on the same setting – we recommend percentages. If you
do not keep your level on the same setting, you will have difficulty
determining what your survey data means.
The ADA Standards set requirements for maximum running and cross slopes, so
surveyors can generally check compliance with the Standards by measuring
where the running slopes appear steepest and where the cross slopes appear
steepest. If the running slopes and cross slopes at the steepest points comply
with the requirements for maximum running and cross slopes, the running and
cross slopes at other locations will also comply. The illustrated survey
instructions for the features where slope and cross slope are likely to be an issue
will show you how and where to take the measurements.
Note: Some architects use a "rise over run" formula to calculate the slope of a
surface. This formula is useful when designing walkways and other surfaces, but
it is not useful when assessing the accessibility of a feature that has already
been constructed. This formula does not reliably provide the actual slope
because it does not take into account factors such as the existing topography of
a site and because it assumes that the slope over the length of the run is
consistent, which is often an inaccurate assumption.
3. Camera
Taking photographs is an important part of an accessibility survey.
Surveying takes a lot of concentrated effort, it can be physically taxing, and even
the best surveyors can make mistakes when they become tired. Photos fill in the
gaps. If a question on a survey form is overlooked accidentally, a well-taken
photograph will sometimes provide the answer to the question. Photos also help
identify accessibility problems that surveyors have inadvertently overlooked. In
addition, photos may be useful for reporting and explaining survey techniques
and results to decision makers and for crafting solutions to accessibility
problems.
For best results, use a digital camera with at least three megapixels of resolution
and a zoom lens. Consider using a strap on your camera, since a camera can
be easily dropped during a long day of shifting back and forth between taking
photos and taking measurements or notes. If possible, use a camera with a
time/date stamp setting showing when photographs were taken, since that
feature will help you organize.
- Remember to charge the camera battery or, for cameras that use
standard disposable batteries, have extra batteries on hand.
- Take “establishing shots” – that is, photographs that show what you are
about to survey. Establishing shots help you to organize your
photographs after the survey work is done for the day. If you are
surveying the County Courthouse, the first photo you should take is an establishing shot showing an easily identifiable exterior view of the
County Courthouse. Remember, establishing shots not only help you
separate photographs of one building from another, they also help you
separate photos of one room from another, otherwise, it may be
difficult to separate photos of one courtroom from another. If the
establishing shot does not include a sign with a room number or
description, consider making a handwritten sign that you photograph.
- Use the camera to take photos of everything measured for accessibility so
you can easily determine the exact location of features that may need to
be modified.
- Consider taking additional photos of the digital level showing slope and
cross slope measurements of walkways and ramps as well as photos
showing exactly where the digital level was placed. This survey technique
will help to resolve questions that may arise about how and where
measurements were taken and whether information recorded on survey
forms is accurate.
- Keep a log of each photograph taken. After all, the drinking fountains on
one floor of a facility will often look very similar to the drinking fountains on
every other floor.
- At the end of your survey day, either print out your photos and label them
carefully or create a detailed photo log while reviewing the photos on a
computer. Remember to stop surveying early enough so you have time to
organize and label your photos.
Whenever possible, include your measuring tape in your photographs. A good
photograph showing the tape measure being used to measure the accessibility of
a feature such as a door is an excellent way of documenting ADA compliance as
well as accessibility problems that need to be addressed. Photographs of this
kind can also assist project managers and facilities and maintenance personnel
in understanding exactly how a feature needs to be modified to provide
accessibility.
4. Pressure Gauge
Many people with disabilities have limitations on the amount of force they can
exert to open a door or operate a device that requires pushing or pulling. In
general, if the operation of a door, a faucet, or other device requires more than 5
pounds of force, it is not accessible to many people with disabilities.
To ensure that doors and mechanical devices are not barriers to accessibility,
you need to measure the force required to operate them. The device used to
make this measurement is called a pressure gauge. A pressure gauge can be
manual or electronic. Either one will work as long as it is periodically checked for proper calibration in accordance with the manufacturer’s instructions. The survey
instructions provided in Appendix 1 will explain how to use the pressure gauge to
measure the force needed to operate specific elements.
Examples of What to Measure with a Pressure Gauge:
Use a pressure gauge to measure the force needed to:
- Open interior doors
- Operate “push-style” faucets
- Operate “push-style” drinking fountains
- Use a paper towel dispenser or hand dryer
- Use call buttons
- Operate locking mechanisms
5. Other Helpful Tools
Many surveyors find other tools helpful, such as a clipboard to hold survey forms,
a binder to hold survey instructions, a tabbed accordion folder to hold copies of
survey forms, a rolling bag to hold survey equipment and forms, and a highlighter
pen to identify barriers on completed survey forms.
ADA Tool Kit for State and Local Governments
|