U.S. Department of Justice
Civil Rights Division
Disability Rights Section |

|
NOTICE
Americans with Disabilities Act
ADA Checklist for Emergency Shelters
July 26, 2007
Reproduction
Reproduction of this document is encouraged.
Additional copies of this publication may be
obtained, viewed or downloaded from the
Publications section of the ADA Website
(www.ada.gov) or by calling the ADA
Information Line at 800-514-0301 (voice),
833-610-1264 (TTY).
Disclaimer
The ADA authorizes the Department of Justice
to provide technical assistance to individuals
and entities that have rights or responsibilities
under the Act. This document provides informal
guidance to assist you in understanding the
ADA and the Department’s regulation.
However, this technical assistance does not
constitute a legal interpretation of the statute.
ADA Checklist for Emergency Shelters
- Evaluating the Physical
Accessibility of Emergency Shelters
- Conducting Accessibility Survey
- Getting Started
- Tools Needed
- Taking Measurements
- Sloped Surfaces
- Using the Tape Measure
- Measuring Door Openings
- Taking Photographs
- Completing the Survey and Checklist
- After Completing the Survey and Checklist
Step One: Accessible Shelter Quick-Check Survey
Selecting Sites to Survey for Accessibility
- Accessible Entrance
- Accessible Routes To All Service/Activity Areas
- Accessibility within Toilet Rooms
Step Two: Ada Checklist For Emergency Shelters
Getting to the Emergency Shelter
- Passenger Drop-Off Areas
- Parking
- Typical Issue
- Parking Spaces Checklist
- Temporary Solutions for Emergency Sheltering - Parking
- Sidewalks and Walkways
- Typical Issues for Individuals Who Use Wheelchairs, Scooters, or other Mobility Devices
Accessible Ramp Features
Temporary Solutions For Emergency Sheltering - Ramps
- Typical Issues for Individuals Who Are Blind or Have Low Vision
Temporary Solutions For Emergency
Sheltering - Protruding Object Hazards
- Entering the Emergency Shelter
Building Entrance
- Hallways and Corridors
- Typical Issues for Individuals Who Use Wheelchairs, Scooters, or Other Mobility Devices
- Typical Issues for People Who are Blind or Have Low Vision
- Check-In Areas
Living at the Emergency Shelter
- Sleeping Areas
- Restrooms and Showers
Toilet Stalls
- Public Telephones
- Drinking Fountains
- Eating Areas
Other Issues
- Availability of Electrical Power
- Single-User or “Family” Toilet Room
- Health Units/Medical Care Areas
- Accessible Portable Toilets
Accessible Emergency Shelters
 One of the most important roles of State and local government
is to protect people from harm, including helping people obtain
food and shelter in major emergencies. When disasters occur,
people are often provided safe refuge in temporary shelters located
in schools, office buildings, tents, or other facilities. Advance
planning for an emergency shelter typically involves ensuring that
the shelter will be well stocked with basic necessities, such as food,
water, and blankets. Planning should also involve ensuring that
these shelters are accessible to people with disabilities. Making
emergency sheltering programs accessible is generally required by
the Americans with Disabilities Act of 1990 (ADA).
One of the most important roles of State and local government
is to protect people from harm, including helping people obtain
food and shelter in major emergencies. When disasters occur,
people are often provided safe refuge in temporary shelters located
in schools, office buildings, tents, or other facilities. Advance
planning for an emergency shelter typically involves ensuring that
the shelter will be well stocked with basic necessities, such as food,
water, and blankets. Planning should also involve ensuring that
these shelters are accessible to people with disabilities. Making
emergency sheltering programs accessible is generally required by
the Americans with Disabilities Act of 1990 (ADA).
A. Evaluating the Physical Accessibility of Emergency Shelters
In order to be prepared for an emergency that requires sheltering,
accessible features should be part of an emergency shelter. A first
step to providing an accessible shelter is to identify any physical
barriers that exist that will prevent access to people with disabilities.
One good way to do this is to inspect each shelter facility that your
community plans to use in an emergency and identify barriers to
people with disabilities, including people who use wheelchairs or
scooters or who have difficulty walking, people who are deaf or
hard-of-hearing, and people who are blind or who have low vision.
Facilities built or extensively altered since the ADA went into effect
in 1992 may have few barriers to accessibility and could be good
choices for emergency shelters. Facilities built before 1992 and not
altered to provide accessibility may have barriers that prevent access
to people with disabilities.
When evaluating physical accessibility in older facilities, it may be
a good idea to do the analysis in two parts. If you suspect that an
older facility is not accessible, you can do a preliminary analysis
before completing a detailed accessibility survey. This preliminary
analysis, or quick-check, can eliminate facilities with extensive
barriers so that the focus can be on those facilities that are most
appropriate to become accessible shelters. To help identify older buildings that may be good candidates to become accessible
shelters, a copy of the Accessible Shelter Quick-Check Survey is
provided on page 7. After completing the Quick-Check Survey,
if you have checked “Yes” for most of the questions on the forms,
you should conduct a full accessibility survey using the ADA
Checklist for Emergency Shelters.
If you find barriers to accessibility after completing the checklist,
the next step is to either remove the barriers or identify other
nearby accessible facilities that can serve as a shelter. In
communities with more than one emergency shelter, until all
shelters are accessible, the locations of accessible shelters should
be widely publicized, particularly to people with disabilities and
organizations that serve the disability community.
B. Conducting Accessibility Surveys
The following Quick-Check Survey (beginning on page 7) and
the ADA Checklist for Emergency Shelters (beginning on page
11) are designed to assist State and local officials and operators of
emergency shelters to determine whether a facility being considered
for use as an emergency shelter is accessible and if not, whether
modifications are needed to remove barriers or whether relocation to
another accessible facility is necessary. Filling out the Quick-Check
Survey will provide guidance on whether a facility has certain basic
accessible features, and filling out the detailed ADA Checklist for
Emergency Shelters will provide specific information on any barriers
to accessibility.
C. Getting Started
Individuals conducting the surveys need not be experienced in
evaluating facilities for accessibility. The checklist provides
guidance on how to complete the survey and will prompt the user
to check key elements. The checklist pages also provide space for
notes and other key information. The checklist is designed to prompt
the user to check key features by asking questions about sizes, sloped
surfaces, and availability of accessible features; and in some areas, it
suggests alternatives if a physical barrier is identified. By following
the directions provided for filling out the checklist, staff can identify
accessible shelters and develop information needed to implement
temporary and permanent accessibility modifications.
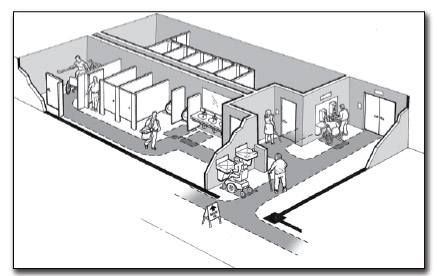
An evaluation of shelter accessibility should focus on those areas of
the facility that may be used for providing shelter in an emergency.
These include areas where people are dropped off by a bus, van, or
car; the parking area; the entrance to the shelter; pedestrian routes
(both exterior and interior); sleeping, eating, information, and
recreational areas; and toilet rooms.
Before shelter accessibility is evaluated, it is useful for staff to
review the instructions for filling out the checklist and become
familiar with the questions. It is also helpful to practice taking
measurements, photographs, and recording information.
On the day of the survey, it is helpful to first become familiar with
certain areas before starting to record information. Upon arrival at
the proposed shelter, first find the areas where people will disembark
from vehicles, both passenger drop-off and loading zones as well as parking areas. Next find the entrances to the shelter areas that
will be used during an evacuation. If possible, take an identifying “location” photograph that shows the name of the facility and the
address so that other photographs can be identified correctly. When
inside the building, locate the areas where people are likely to
register, sleep, and eat. Locate the toilet rooms that serve the shelter
area. It is also a good idea to locate any areas used for telephones,
food distribution, and medical services.
D. Tools Needed
The following items are needed for the survey:
- A metal tape measure that is at least 20 feet long;
- A digital level or bubble level that is 24 inches long;
- A door pressure gauge;
- A digital (preferred) or film camera with a flash;
- One copy of the checklist for each shelter
(and Quick-Check Survey if used); and
- A clipboard and pens.
If you are not familiar with taking the types of measurements needed
to complete the checklist, review the following section and practice
using the tools before going to conduct a survey.
E. Taking Measurements
1. Sloped Surfaces
Measuring the slope of a ramp, parking space, walkway, or other
ground or floor surface is important to identify whether the surface is
accessible. The amount of slope or grade is described as the proportion
of a vertical rise to a horizontal length. It is usually described
as:
- a ratio (e.g., 1:20, which means one unit of vertical rise for
each 20 units of horizontal length); or
- a percentage (e.g., 8.33% which equates to a ratio of 1:12 or
4.76 degrees).
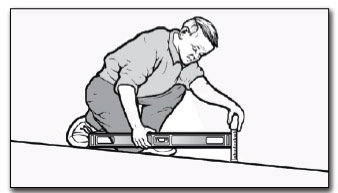
The easiest way to measure slope is to use a digital level. The digital
display gives a reading that may be shown as a percent, degrees,
or as a digital bubble. Before using a digital level, make sure to
understand the directions for its use. It will need to be calibrated
before each use. The maximum running slope generally allowed
for ramps is 1:12 (8.33% or 4.76 degrees). Cross slope is the slope
or grade of a surface perpendicular to the running slope. The most
cross slope allowed on an accessible route is 1:50 (2% or 1.15
degrees).
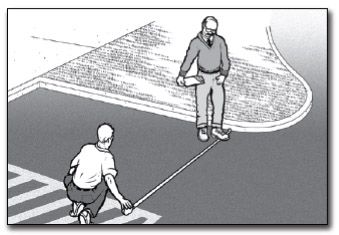
Another way to measure slope that requires more effort is to use a 24-inch level
with leveling bubble and a metal tape measure. Place the level on the sloped
surface in the direction you wish to measure. Rest one end of the level at the
highest point of the sloped surface and lift the other end (see below) until the
bubble is in the middle of the tube. This is the “level” position. While the level is
in this position, measure the distance between the end of the level and the sloped
surface below. If the distance is two inches or less, then the slope is 1:12 or less.
When the distance is more than two inches, record the distance on the checklist so
the exact slope can be calculated later. For measuring cross slope, if the distance,
measured from the level position, is ½ inch or less then the slope is 1:48 or less.
 |
|
| Measuring slope using a 24-inch bubble level and tape measure |
2. Using the Tape Measure
A metal tape measure is needed to measure the length, width, height, and depth
of various elements. When measuring long distances, pull the tape tight to get
an accurate measurement. The checklist will offer guidance for the specific
measurement that is required.
 |
| Using a tape measure to measure the width of a parking space |
3. Measuring Door Openings
Special care is needed when
measuring the clear opening
of a doorway. To measure
the clear opening of a
standard hinged door, open
the door to 90 degrees. Place
the end of the tape measure
on the side of the door frame
next to the clear opening
(see below). Stretch the tape
across the door opening to
the face of the door. This
measures the clear width of
the door opening through
which people pass, which
is less than the width of the
door itself.
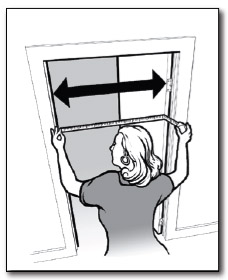 |
| Measuring the clear opening from the face of the doorstop on the frame to the face of the open door |
F. Taking Photographs
A comprehensive set of photographs makes it easier to understand
existing conditions after the survey is completed. It is a good idea
to take many photos of the exterior and interior of the potential
shelter. It is likely that many other people in your decision-making
process will need to review information about the facility you are
surveying, so try to record each element that you survey with several
photos. It is always useful to first take a photo that will clearly identify the location of the element so that others will easily be able
to find the element. Then, take several close-up shots of that element
to document the conditions you found during your survey. If you
are not familiar with the camera that you plan to use, practice using
it both indoors and outdoors before starting to survey the various
facilities being considered for use as shelters. If you are using a
digital camera, it is a good idea to review the images as you take
them to ensure that you have good quality photographs.
G. Completing the Survey and Checklist
The survey and checklist forms will prompt you for what to look
at and where to measure. You should write down all answers and
notes for use later in the planning process. If a photo is taken of
a particular element or condition, then you should note this on the
checklist. It is usually more efficient for two or three people to work
together doing these surveys. One person can measure while the
other records the information and takes photos.
For each item, check either “Yes” or “No.” If the measurement
or number falls short of that required for accessibility, write the
measurement or number to the right of the question. Add notes or
comments as needed. For some questions when “No” is the answer,
the checklist will include a prompt to check for an alternate solution.
Information on possible alternative solutions can be used later to
decide how to better provide accessibility. Taking several photos
is also helpful when the answer is “No” and an alternative way to
provide accessibility is not readily apparent.
When completing the survey or checklist, try to answer every
question in each section unless the element is not present at that
facility. For example, if no parking lot is provided at the facility,
(such as where only on-street parking is provided), do not measure
the size of the on-street parking spaces.
Some sections of the checklist are divided into two parts, one for
individuals with a mobility disability and the other for individuals
who are blind or who have low vision. While evaluating a facility
you will be checking to ensure that an accessible route is provided.
The accessible route is a continuous unobstructed pedestrian path
without steps or steep slopes that connects all accessible site and
building features and spaces together. A continuous accessible route
must be available at the shelter for people who use a wheelchair,
scooter, or other mobility device. Other sections of the checklist ask
questions related to individuals who are blind or have low vision.
These questions cover all circulation paths, not just pedestrian paths
that are also an accessible route.
The survey and the checklist are based on some of the requirements
from the ADA Standards for Accessible Design (the Standards).
Questions have been selected to reflect features that may be most
important for the short-term stays common for emergency shelters.
To learn more about the Standards, see the Department of Justice
regulations, 28 C.F.R. Part 36, Appendix A. The regulations and the
Standards are available at www.ada.gov. Copies are also available
by calling the ADA Information Line at 800-514-0301 (voice) or
833-610-1264 (TTY).
H. After Completing the Survey and Checklist
Once you have completed the survey and filled out the checklist,
you can determine which elements or spaces in a potential shelter
facility are accessible and which may need modifications. If most
answers are “yes,” the facility may need little or no modification.
If some answers are “no,” modifications may be needed to remove
barriers found in that space or element. Emergency shelters in older
buildings with inaccessible features might be made accessible with
temporary modifications, (such as portable ramps at the entrance
and accessible parking spaces marked off by traffic cones) until
permanent modifications can be made. However, where facilities are
not capable of being made accessible, another facility will need to be
selected for use as a shelter.
Step One: Accessible Shelter Quick-Check Survey
Selecting Sites to Survey for Accessibility
Providing an emergency shelter that is accessible to people with disabilities involves making sure that a number
of accessible features and spaces are available. To verify accessibility before deciding on a site for an emergency
shelter can involve asking many questions such as those in the ADA Checklist for Emergency Shelters. For some
older buildings, especially those on hilly sites and those that have not been renovated, remodeled, or altered since
1992, before completing the detailed checklist, it may be better to do a pre-test that can rule out a facility with
major accessibility problems so available resources can be focused on other locations. The following questions
will help evaluate whether a facility has such major accessibility barriers. After this first step, buildings that
do not have major accessibility problems should be surveyed more thoroughly, using the ADA Checklist for
Emergency Shelters, to find out which, if any, barriers need to be removed to provide an accessible shelter.
A. Accessible Entrance
Having a way to get into the emergency shelter on a surface that is firm, stable, slip resistant,
without steps or steep slopes, and wide enough for a person using a wheelchair
or other mobility aid is essential.
A1. Is there a sidewalk connecting the parking area and any drop off area to
the walkway leading to the building? [ADA Standards § 4.1.3(1)]
Yes
No
A2. Is there a route without steps from this sidewalk to the main entrance?
Yes
No
If No, are there two or fewer steps? Yes _____ No ____ Number of Steps: __________
If No, is there another entrance without steps that is connected by a sidewalk
to the parking or drop off area? Yes _____ No _____Location: _________________
B. Accessible Routes To All Service/Activity Areas
Everyone must be able to get to each of the various areas where activities and services
take place. This includes people who use mobility devices, such as wheelchairs and
scooters, being able to get to locations where supplies are distributed, to eating areas, to
sleeping areas, to toilet rooms, and to other activity areas without encountering stairs or
steep slopes.
Check all of the various ways to get to each of the areas where sheltering activities are
likely to take place (sleeping, eating,
B1. Sleeping Area (Location: ______________________________________)
B1-a. Is there a route without steps from the accessible entrance to this
location?
Yes
No
If No, are there two or fewer steps? Yes ___ No ___ Number of Steps: _______
If No, is there a ramp, lift, or elevator? Yes ___ No ___ Type of device: _______
B1-b. If an elevator or lift provides the only accessible route, is there
a source of backup power to operate the device for an extended
period?
Yes
No
B2. Eating Area (Location: ______________________________________)
B2-a. Is there a route without steps from the accessible entrance to this
location?
Yes
No
If No, are there two or less steps? Yes ___ No ____ Number of Steps: _____
If No, is there a ramp, lift, or elevator? Yes ___ No ____ Type of device: _______
B2-b. If an elevator or lift provides the only accessible route, is there a
source of back up power to operate the device for an extended
period?
Yes
No
B3. Supply Distribution Area (Location: _____________________________)
B3-a. Is there a route without steps from the accessible entrance to this
location?
Yes
No
If No, are there two or fewer steps? Yes ___ No ___ Number of Steps: ______
If No, is there a ramp, lift, or elevator? Yes ___ No ___ Type of device: ______
B3-b. If an elevator or lift provides the only accessible route, is there
a source of backup power to operate the device for an extended
period?
Yes
No
B4. Toilet Rooms (Location: ________________________________________)
B4-a. Is there a route without steps from the accessible entrance to this
location?
Yes
No
If No, are there two or fewer steps? Yes ___ No ____ Number of Steps: ______
If No, is there a ramp, lift, or elevator? Yes ____ No ____ Type of device: ______
B4-b. If an elevator or lift provides the only accessible route, is there
a source of backup power to operate the device for an extended
period?
Yes
No
C. Accessibility Within Toilet Rooms
C1-a. Is there an area within the toilet room where a person who
uses a wheelchair or mobility device can turn around - either
a minimum 60-inch diameter circle or a “T”-shaped turn area?
[ADA Standards §§ 4.22.3; 4.2.3, Fig. 3]
Yes
No
C1-b. Is at least one stall at least 60 inches wide and 56 inches deep
(wall mounted toilet) or 59 inches deep (floor mounted toilet)?
[ADA Standards § 4.17.3]
Yes
No
Using The Information:
If most of your answers to the previous questions are Yes, then the facility has some basic accessibility features
and should be surveyed using the ADA Checklist for Emergency Shelters. Whenever most of your answers are
No, then these problems should be evaluated before conducting a more detailed survey, or perhaps you should
consider another location to serve as an emergency shelter.
Step Two - ADA Checklist For Emergency Shelters
Getting to the Emergency Shelter
A. Passenger Drop-Off Areas
During an evacuation the most efficient method of transporting people to shelters likely will include using vans and buses. Accessible buses
and vans with wheelchair lifts will be needed to transport people who use wheelchairs, scooters, or other mobility aids. When they arrive at
the shelter, an accessible drop-off area (also known as a passenger loading zone) is needed for people using mobility aids to get off of the bus
or van and proceed to the shelter's accessible entrance.
An accessible drop-off area must have a level access aisle that is
adjacent and parallel to the vehicle space. Where a curb separates
the vehicle space from the access aisle or the access aisle from
an accessible route, a curb ramp must be provided so people with
mobility disabilities can get to the accessible route leading to the
accessible entrance of the shelter.
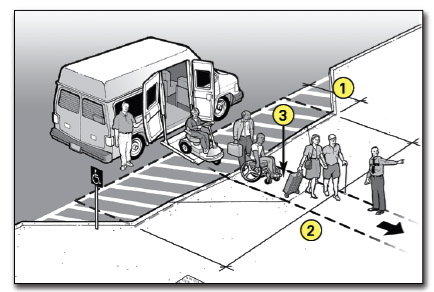 |
| Accessible drop-off area with an access aisle provided at the same level as the vehicle. |
Notes
1. Access aisle depth is at least 5 feet.
2. Access aisle length is at least 20 feet. 3.
3. Curb ramp connects the access aisle for the accessible drop-off area
(which is at the level of the parking lot) to the accessible route to the accessible entrance of the shelter.
The access aisle may be at the parking-lot level or at sidewalk level. If the access aisle
is at the parking-lot level, the curb ramp is provided between the access aisle and the
sidewalk. If it is at the sidewalk level, an adjacent curb ramp is provided between the
street and the sidewalk.
 |
| Accessible drop-off area with an access
aisle provided as part of the sidewalk. |
A1. Is a relatively level (1:50 or 2%
maximum slope in all directions)
access aisle provided adjacent
and parallel to the side of the
vehicle pull-up area?
[ADA Standards § 4.6.6]
Yes
No
If No, look for another relatively level location that is on an accessible route to the accessible shelter entrance that could be used.
A2. Is the vehicle pull-up area relatively level (1:50 or 2% maximum slope in
all directions)?
Yes
No
A3. Is the area for the access aisle at least 5-feet wide and 20-feet long?
[ADA Standards § 4.6.6].
Yes
No
Note: Unlike at an accessible parking space, the surface for the access aisle of an
accessible passenger drop-off area does not have to be marked or striped.
A4. Is there vertical clearance of at least 114 inches (9 feet 6 inches) from the
site entrance to the vehicle pull-up area, the access aisle, and along the
vehicle route to the exit? [ADA Standards § 4.6.5]
Yes
No
A5. Is a curb ramp provided between the vehicle pull up area and the access
aisle (see above) or the access aisle and the accessible route to the
accessible entrance? [ADA Standards § 4.6.6]
Yes
No
If No, is there another area with a curb ramp and on an accessible route that could serve as the drop-off area?
If there is no curb ramp near the drop-off area, can a temporary ramp be used to connect the drop-off
area access aisle to the accessible route to the accessible shelter entrance?
A6. If a curb ramp is provided, is the running slope of the ramp surface (not
counting the side flares) no more than 1:12 or 8.33%
[ADA Standards § 4.7.2]
Yes
No
A7. Is the width of the curb ramp surface at least 36 inches (not counting the
side flares)? [ADA Standards § 4.7.3]
Yes
No
A8. Does an accessible route connect the curb ramp to the shelter’s
accessible entrance? [ADA Standards § 4.1.2(1)]
Yes
No
B. Parking
1. Typical Issues
During an evacuation, some individuals with a mobility disability may arrive at the shelter in a car or van. When parking areas are provided
at the shelter site, accessible parking spaces must be provided. Individuals with disabilities who arrive at the shelter in their own car or van
need to be able to park in an accessible parking space close to an accessible entrance. Accessible parking spaces need an adjacent access aisle
that provides space for a person with a mobility disability to exit their vehicle. The access aisle connects directly to an accessible route that
leads to an accessible building entrance. In order to be usable, the access aisle must be relatively level, clear of gravel or mud, and the surface
must be in good condition without wide cracks or broken pavement.
An accessible route connects the permanent access aisle of each accessible
parking space with the accessible entrance to the shelter. When an accessible
route crosses a curb, a curb ramp must be provided. During an emergency,
as a temporary measure, if additional accessible parking spaces are needed, a
portable ramp can be provided in a parking space marked off by traffic cones to
provide two additional accessible parking spaces (see page 18).
 |
An accessible entrance to an emergency shelter with accessible parking and additional temporary accessible parking spaces |
Notes:
1. Accessible route.
2. Accessible parking with van accessible parking space.
3. Accessible entrance to shelter.
4. Temporary accessible parking spaces.
2. Parking Spaces Checklist
B1. When parking areas are provided at the shelter site, count the total
number of parking spaces provided in each area. Is the minimum
number of accessible parking spaces provided, based on the total
number of available parking spaces (see table below)?
[ADA Standards § 4.1.2(5)(a)]
Yes
No
| Total Number of Parking Spaces
in Each Parking Area |
|
Required Minimum Number of Accessible Spaces |
| |
|
|
| 1- 25 |
|
1 van-accessible space w/min. 96-inch-wide access aisle (van space) |
| 26 - 50 |
|
1 space w/min. 60-inch-wide access aisle + 1 van space |
| 51 - 75 |
|
2 spaces w/min. 60-inch-wide access aisle + 1 van space |
| 76 - 100 |
|
3 spaces w/min. 60-inch-wide access aisle + 1 van space |
| 101 - 150 |
|
4 spaces w/min. 60-inch-wide access aisle + 1 van space |
If more than 150 parking spaces are provided in a particular lot,
see section 4.1.2 of the ADA Standards for the number of accessible parking spaces required.
B2. Does each accessible parking space have its own, or share, an adjacent
access aisle that is least 60 inches (5 feet) wide? [ADA Standards § 4.6.3]
Yes
No
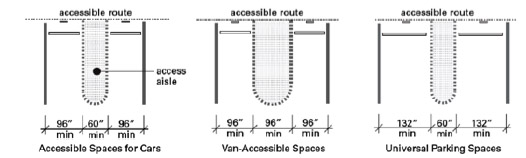 |
| Accessible Parking Spaces Showing Minimum Width of Vehicle Space and Access Aisle |
B3. Is there at least one van-accessible parking space provided with an
access aisle that is at least 96 inches (8 feet) wide or are universal
parking spaces provided that are 132 inches (11 feet) wide for vehicle
space with a 60-inch (5-feet) wide access aisle?
[ADA Standards § § 4.1.2(5), A4.6]
Yes
No
B4. For van-accessible spaces (particularly in a garage or parking structure),
is there vertical clearance of at least 98 inches (8 feet - 2 inches) for the
vehicle route to the parking space, the parking space, the access aisle,
and along the vehicle route to the exit? [ADA Standards § 4.6.5]
Yes
No
If No: Can the route be cleared by removing or raising low objects, or can each van accessible parking space be relocated?
B5. Are all accessible parking spaces, including the access aisle, relatively
level (1:50 or 2%) in all directions? [ADA Standards § 4.6.3]
Yes
No
If No: Look for a nearby area that is relatively level in all directions that could serve as
an accessible parking space with an accessible route to the accessible entrance to the
shelter.
B6. Does each accessible parking space have a sign with the symbol of
accessibility that is visible when a vehicle is parked in the space?
[ADA Standards § 4.6.4]
Yes
No
B7. If there is a curb between the access aisle and the accessible route to the
building, is there a curb ramp that meets the following requirements:
[ADA Standards § 4.7]
Yes
No
 |
| Curb ramp showing minimum 36-inch width
for ramp section and 1:12 slope on ramp
section. |
B7-a. Is the curb ramp surface at least 36 inches wide, excluding flared
sides? [ADA Standards § 4.7.3]
Yes
No
B7-b. Is the slope (up or down the ramp) no more than 1:12?
[ADA Standards § 4.7.2]
Yes
No
Note: 1:12 is one inch of vertical height for each 12 inches of length.
B8. Are the accessible parking spaces serving the shelter on the shortest
accessible route to the accessible entrance? [ADA Standards § 4.6.2]
Yes
No
B9. Does each access aisle connect to an accessible route from the parking
area to the shelter's accessible entrance? [ADA Standards § 4.6.2]
Yes
No
3. Temporary Solutions for Emergency Sheltering - Parking
Problem: Parking at the shelter facility either has no accessible
parking, not enough accessible parking, or accessible
parking spaces are not on level ground.
Suggestion: Find a fairly level parking area near the
accessible entrance and mark the area for
accessible parking spaces. Three regular
parking spaces will make two accessible parking
spaces with a shared access aisle. Provide a
sign designating each accessible parking space.
Ensure there is an accessible route from each
access aisle to the accessible entrance.
If temporary accessible spaces are used, mark the temporary
accessible parking spaces with traffic cones or other temporary
elements. Traffic cones can also be used to mark off an access
aisle if designated accessible parking spaces lack an access
aisle or if the access aisle is too narrow. At least one accessible
parking space should be a van-accessible parking space with an
access aisle that is at least 96 inches wide.
 |
| Three standard parking spaces are converted into an accessible parking space with an access aisle. Cones mark the access aisle and a temporary curb ramp with edge protection connects to an accessible route to the shelter. |
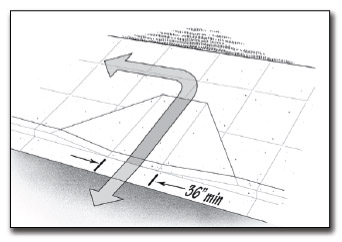
C. Sidewalks and Walkways
1. Typical Issues for Individuals Who Use Wheelchairs, Scooters, or other Mobility Devices
An accessible route connects accessible passenger drop-off
areas, accessible parking spaces, and other accessible elements,
like a route from a bus stop, to an accessible building entrance.
The accessible route is essential for people who have difficulty
walking or who use wheelchairs or other mobility aids to get
to the accessible entrance of the shelter. The accessible route
must be at least 36 inches wide (it may narrow briefly to 32
inches wide where utility poles, signs, etc. are located along the
accessible route). Abrupt level changes, steps, or steep running
or cross slopes cannot be part of an accessible route. Where
ramps are used, they cannot be steeper than 1:12. Ramps with a
vertical rise of more than 6 inches must have handrails on both
sides. Ramps must also have edge protection to stop wheelchairs
from falling off the sides, and level landings at the top and
bottom of each segment and where the ramp changes direction.
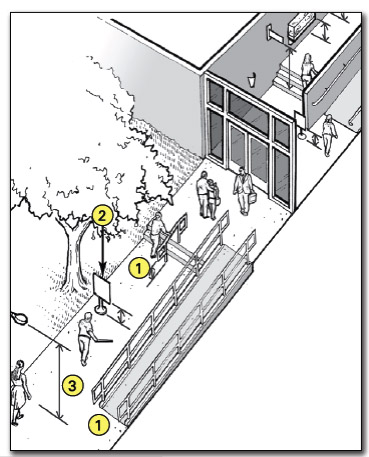
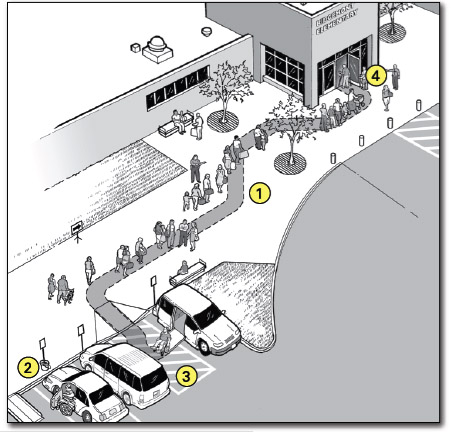 |
An accessible entrance to a shelter with accessible parking
and an accessible drop-off area |
Notes:
1. Accessible route
2. Accessible drop-off area
3. Accessible parking with van-accessible parking space
4. Accessible entrance to shelter
C1-a. Is an accessible route provided from accessible parking spaces to the
accessible entrance of the shelter? [ADA Standards § 4.1.2(1), 4.3]
Yes
No
C1-b. Is an accessible route provided from public sidewalks and public
transportation stops on the shelter site (if provided) to the accessible
entrance for the shelter? [ADA Standards § 4.1.2(1)]
Yes
No
Note: The accessible route is at least 36 inches wide and may be a portion of a sidewalk.
C1-c. Is the accessible route at least 36 inches wide? [ADA Standards § 4.3.3]
Yes
No
If No, does the accessible route narrow to 32 inches for no more than 2 feet?
C1-d. Is the accessible route free of steps and abrupt level changes higher than
1/2 inch? [ADA Standards § 4.3.8]
Yes
No
Note: Level changes between 1/4 inch and 1/2 inch should be beveled (sloped) at 1:2 maximum.
C1-e. Where an accessible route crosses a curb, is a curb ramp provided?
[ADA Standards § 4.3.8]
Yes
No
e-i. Is the curb ramp surface at least 36 inches wide, excluding flared
sides? [ADA Standards § 4.7.3]
Yes
No
e-ii. Is the running slope (up or down the ramp) no more than 1:12?
[ADA Standards § 4.7.2]
Yes
No
Note: 1:12 is one inch of vertical height for 12 inches of horizontal distance.
C1-f. If the slope of part of the accessible route is more than 1:20, does it meet
the following requirements for an accessible ramp?
Yes
No
f-i. Is the running slope no greater than 1:12? [ADA Standards § 4.8.2]
Yes
No
Note: For existing ramps, the slope may be 1:10 for a 6-inch rise and 1:8 for a 3-inch rise in special circumstances (see ADA Standards § 4.1.6(3)).
f-ii. Are handrails installed on both sides of each ramp segment?
[ADA Standards § 4.8.5]
Yes
No
f-iii. Is the ramp width, measured between the handrails, at least 36
inches? [ADA Standards § 4.8.3]
Yes
No
f-iv. Does the ramp have a level landing at the top and bottom of each
ramp section that is at least 60 inches long?
[ADA Standards § 4.8.4]
Yes
No
Note: The level landing may be part of the sidewalk or walking surface.
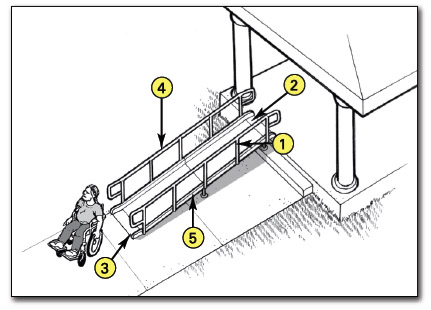 |
| Accessible ramp features |
Notes:
1. At least 36 inches between handrails
2. Top landing part of walk
3. Bottom landing part of walk
4. Handrail height 34 to 38 inches
5. Edge protection.
f-v. If a ramp is more than 30 feet long, is a level landing at least 60
inches long provided at every 30 feet of horizontal length?
[ADA Standards § 4.8.4]
Yes
No
Note: if the running slope is less than 1:16 but more than 1:20, each ramp segment may be up to 40 feet long followed by a level landing].
f-vi. Is there a level landing, at least 60 inches x 60 inches, when a
ramp changes direction? [ADA Standards § 4.8.4]
Yes
No
f-vii. Are the handrails mounted 34 to 38 inches above the ramp
surface? [ADA Standards § 4.8.5]
Yes
No
f-viii. If the ramp or landing has a vertical drop-off on either side, is
edge protection provided? [ADA Standards § 4.8.7]
Yes
No
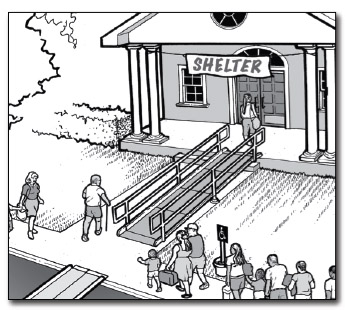
Temporary Solutions For Emergency Sheltering - Ramps
Problem: The sidewalk connecting parking to the shelter entrance is too steep to be accessible.
Suggestion: Check to see if there is another accessible route to the accessible entrance. Sometimes there is a
less direct route that is accessible. During an evacuation it will be helpful to put up signs or to
have volunteers stationed at the accessible parking spaces to direct people along this less direct, but
nonetheless accessible, route.
Problem: The accessible route crosses a curb but no curb ramp is
provided.
Suggestion: Install a portable ramp with a slope no steeper than 1:12
with edge protection. Store the portable ramp on site so
it can be easily accessed in an emergency.
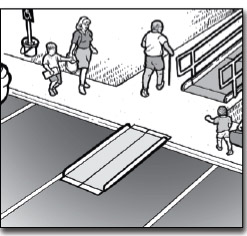 |
| A portable ramp with edge protection is installed over a curb to provide an accessible route. |
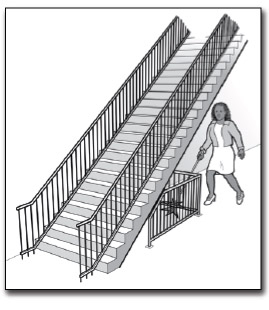
Problem: There are two steps where the sidewalk connects to the
accessible entrance.
Suggestion: Install a portable ramp with a slope no steeper than 1:12
with edge protection and handrails on both sides of the
ramp. Store the portable ramp and components on site
so everything can be easily accessed in an emergency.
|
| A portable ramp with edge protection and handrails is
installed over two steps to provide an accessible route. |
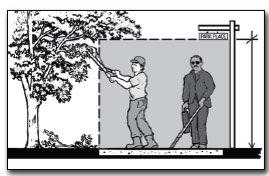
2. Typical Issues for Individuals Who Are Blind or Have Low Vision
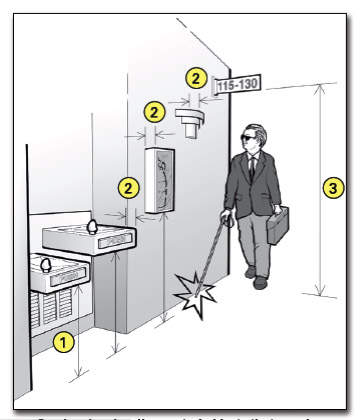
Objects that are wall mounted, that project into a pedestrian route from the
side, or that are overhead can be hazards to people who are blind or who have
low vision. These objects must be positioned so people will either detect the
objects before they run into them or safely pass under them. Examples may
include handrail extensions on stairs and ramps, post- or wall-mounted signs,
drinking fountains, and low hanging tree limbs. Pedestrian routes open to
people during the time that the facility is being used as an emergency shelter,
such as sidewalks, courtyards, and plazas, must be free of overhanging
objects that are less than 80 inches above the route. Objects more than 27
inches and less than 80 inches above the route and that protrude from the side
more than 4 inches are also a hazard. Since people can walk on any sidewalk,
not just the accessible routes, all exterior pedestrian routes serving or leading
to the shelter areas must be checked. The following questions apply to
sidewalks and walkways leading to the emergency shelter.
 |
Common objects along pedestrian routes to a shelter that can be hazards to people who are blind or have low vision.
|
Notes:
- The bottom of the handrail extensions turn down to 27 inches or less
above the route so a person who is blind or has low vision can detect the hazard before running into it.
- Signs or other objects in the pedestrian route can be a hazard if the
bottom is more than 27 inches but less than 80 inches above the route.
- Objects that overhang the pedestrian route must be at least
80 inches above the route.
C2-1. Are all sidewalks and walkways to the shelter free of any objects
(e.g., wall-mounted boxes, signs, handrail extensions) with bottom
edges that are between 27 inches and 80 inches above the walkway
and that extend more than 4 inches into the sidewalk or walkway?
[ADA Standards §§ 4.4, 4.2.1(3), 4.1.3(2)]
Yes
No
If No, can the object be lowered, removed, or modified or can the route be moved so
that the object can be avoided?
C2-2. Are the undersides of exterior stairs enclosed or protected with a cane-detectable
barrier so that people who are blind or have low vision will
not hit their heads on the underside? [ADA Standards § 4.4.2]
Yes
No
If No, can a barrier or enclosure be added below the stair or can the route be relocated away from the stair?
 |
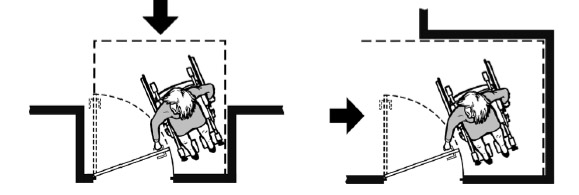
| When the underside of a stair is open, it is a hazard to people who are blind or have low vision. Enclosing the area below the stair or installing a cane-detectable barrier helps this woman to stop before hitting her head. |
C2-3. Are all objects that hang over
the pedestrian routes at least
80 inches above the route?
[ADA Standards § 4.4.2]
Yes
No
If No, can the objects be removed
or relocated, or can
a cane-detectable object be added below that is at no higher than 27 inches?
 |
| Overhead sign and tree branches are least 80
inches above the walk. |
Temporary Solutions For Emergency Sheltering - Protruding Object Hazards
Problem: Objects protrude too far from the side into the route causing a hazard for people who are blind or
who have low vision.
Suggestion: When people who are blind or who have low vision use a cane to detect hazards, objects located
at 27 inches or lower are detectable. When an object is located higher than 27 inches above the
ground it is a hazard if the object protrudes more than 4 inches into the circulation path. To make a
protruding object cane-detectable:
- Place an object below, or on either side of, the protruding object that is not higher than 27
inches above the ground.
- If the protruding object can be moved, lower the object so that its bottom is not more than 27
inches above the ground.
- Prune or alter the protruding object so it does not protrude above the route.
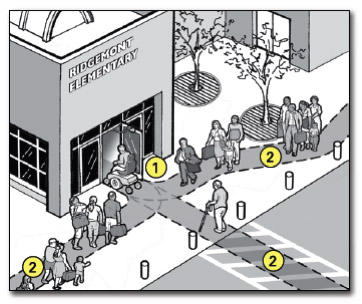
D. Entering the Emergency Shelter
Building Entrance
 |
Notes:
- Accessible entrance to the shelter.
- Accessible route connecting accessible parking and
drop-off area (if provided) to the accessible entrance.
|
A shelter must have at least one accessible entrance that is on an accessible route. An accessible entrance must provide at least one accessible door with maneuvering space, accessible hardware, and enough clear width to allow people who use crutches, a cane, walker, scooter, or wheelchair to use it.
If the accessible entrance is not the main entrance to the facility that is being used as a shelter, signs must be located at inaccessible entrances to direct evacuees and volunteers to the accessible entrance. The accessible entrance must be unlocked when other shelter entrances are unlocked.
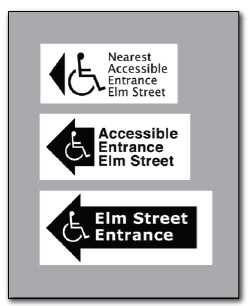 |
| Examples of signs for inaccessible
shelter entrances directing people to
the accessible entrance. |
D1. Is there at least one accessible entrance connected to an accessible
route? [ADA Standards § 4.1.3(1)]
Yes
No
Notes: If this entrance is not the main entrance, it needs to be kept unlocked when
other shelter entrances are unlocked.
If there are inaccessible entrances serving the shelter, signs will be needed at
inaccessible entrance(s) to direct evacuees to the nearest accessible entrance.
D2. Does at least one door or one side of a double leaf-door provide at
least 32 inches clear passage width when the door is open 90 degrees?
[ADA Standards § 4.13.5]
Yes
No
If No, does another entrance have an accessible door or can both doors be propped
open during the evacuation? Other possible solutions are to enlarge the door opening,
use a swing clear hinge, or, if a double-leaf door, replace with uneven width doors.
D3. Is the hardware (e.g., lever, pull, and panic bar) usable with one
hand without tight grasping, pinching, or twisting of the wrist?
[ADA Standards § 4.13.9]
Yes
No
If No, leave door propped open, add new accessible hardware, or adapt/replace
hardware.
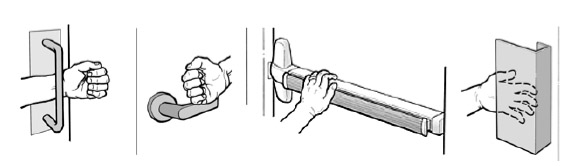 |
| Examples of handles and door hardware that can be used without tight grasping, pinching, or twisting. |
D4. On the latch, pull side of the door, is there at least 18 inches clearance
provided if the door is not automatic or power-operated? [ADA Standards § 4.13.6, Fig. 25]
Yes
No
If No, leave the door propped open or find another accessible entrance.
D5. If there is a raised threshold, is it no higher than 3/4 inch at the door and
beveled on both sides? [ADA Standards §§ 4.1.6(3)(d)(ii), 4.13.8]
Yes
No
If No, replace threshold with one with beveled sides or add a sloped insert.
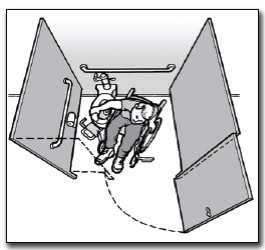
D6. If an entry has a vestibule, is there a 30-inch by 48-inch clear floor space
inside the vestibule where a wheelchair or scooter user can be outside
the swing of a hinged door? [ADA Standards § 4.13.7]
Yes
No
If No, leave the inner door permanently open, remove inner door, or modify the vestibule.
E. Hallways and Corridors
1. Typical Issues for Individuals Who Use Wheelchairs, Scooters, or Other Mobility Devices
The interior accessible route connects the accessible entrance with the various service and activity areas within the shelter. Typically made
up of hallways, corridors, and interior rooms and spaces, the accessible route is essential for people who have difficulty walking or who use
wheelchairs or other mobility aids to get to all of the service and activity areas of the shelter.
An accessible route is at least 36 inches wide and may narrow briefly to 32 inches wide where the route passes through doors or next to
furniture and building elements. High thresholds, abrupt level changes, steps, or steep running or cross slopes cannot be part of an accessible
route. Where ramps are used, they cannot be steeper than 1:12. Ramps with a vertical rise of more than 6 inches must have handrails on both
sides. Ramps must also have edge protection to stop wheelchairs from falling off the sides, and level landings at the top and bottom of each
segment and where a ramp changes direction.
Where an accessible route is different from the route used by most evacuees, signs will
be needed at key decision points to direct individuals with disabilities to the various
activity areas.
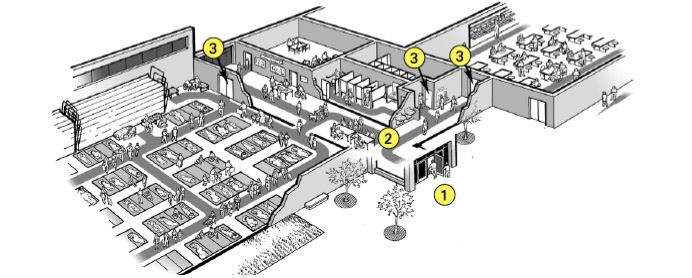 |
| Interior of a shelter showing the accessible route from the
accessible entrance to all service and activity areas. |
Notes:
- Accessible Entrance
- Accessible Route connects the accessible entrance with shelter service and activity area
- Accessible door to service and activity areas
E1-a. Is there an accessible route, at least 36 inches wide, that connects the
accessible entrance to all shelter areas (it may narrow to 32 inches wide
for up to 2 feet in length)? [ADA Standards § 4.3.2(3)]
Yes
No
E1-b. Is the accessible route free of steps and abrupt level changes over 1/2
inch?
Yes
No
Note: level changes between 1/4 inch and 1/2 inch should be beveled).
[ADA Standards §§ 4.1.3(1), 4.3.8]
E1-c. Does the accessible route from the accessible entrance to
all activity areas change levels using a ramp, lift or elevator?
[ADA Standards §§ 4.1.3(1), 4.3.8]
Yes
No
If No, go to question E1-g.
c-i. If Yes, is a ramp or sloped hallway provided?
Yes
No
If Yes, go to question E1-d.
c-ii. Is an elevator or lift provided?
Yes
No
If Yes, and the elevator or lift is part of the accessible route to a shelter area, is back-up electrical power available to operate the elevator or lift for the duration of shelter operation should the normal electrical service be disrupted?
If Yes and an elevator is provided, see question E1-e.
If Yes and a lift is provided, see question E1-f.
If No, then either provide back-up electrical power to operate the lift or elevator
during the power outage or locate shelter services exclusively on accessible
levels that may be reached by people with a mobility disability without using
an elevator or lift.
E1-d. Where the slope of the accessible route is greater than 1:20, does this
area meet the following requirements for an accessible ramp?
Yes
No
d-i. Is the slope no greater than 1:12? [ADA Standards § 4.8.2]
Yes
No
Note: For existing ramps, the slope may be 1:10 for a 6-inch rise and 1:8 for
a 3-inch rise in special circumstances]. [ADA Standards § 4.1.6(3)
d-ii. Are handrails installed on both sides of each ramp segment?
[ADA Standards § 4.8.5]
Yes
No
d-iii. Is the ramp width, measured between handrails, at least 36
inches? [ADA Standards § 4.8.3]
Yes
No
d-iv. Are the handrails mounted 34 to 38 inches above the ramp
surface? [ADA Standards § 4.8.5]
Yes
No
d-v. If a ramp is longer than 30 feet, is a level landing at least 60 inches
long provided every 30 feet? [ADA Standards § 4.8.4]
Yes
No
d-vi. Does the ramp have a level landing that is at least 60 inches long
at the top and bottom of each ramp section or where the ramp
changes direction? [ADA Standards § 4.8.4]
Yes
No
d-vii. If the ramp or landing has a vertical drop-off on either side of the
ramp, is edge protection provided? [ADA Standards § 4.8.7]
Yes
No
E1-e. Is an elevator provided to each of the levels on which each sheltering
service or activity area is located?
Yes
No
e-i. Are the centerlines of the call buttons mounted 42 inches above
the floor? [ADA Standards § 4.10.3]
Yes
No
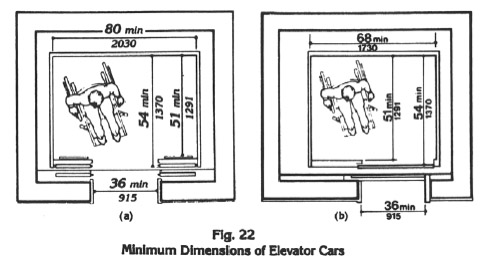
e-ii. Does the floor area of the elevator car have space to enter, reach
the controls, and exit? [ADA Standards § 4.10.9, Fig. 22]
Yes
No
Note: See Figure 22 for acceptable floor and opening dimensions. Floor dimensions of at least 48 inches by 48 inches may be allowed in existing facilities built before the ADA went into effect.
e-iii. Can the elevator be called and operated automatically without
using a special key or having to turn on the elevator from a
remote location? [ADA Standards § 4.10.2]
Yes
No
e-iv. Are the highest floor control buttons mounted no more than 54
inches above the floor for a side reach or 48 inches for forward
reach? [ADA Standards § 4.10.12 (3)]
Yes
No
e-v. Are raised letters and Braille characters used to identify each floor
button and each control? [ADA Standards § 4.10.12]
Yes
No
e-vi. Are signs mounted on both sides of the elevator hoist way door
opening (for each elevator and at each floor) that designate
the floor with 2-inch minimum-height raised letters and Braille
characters centered at 60 inches above the floor?
[ADA Standards § 4.10.5]
Yes
No
e-vii. Is the elevator equipped with audible tones or bells or verbal
annunciators that announce each floor as it is passed?
[ADA Standards § 4.10.13]
Yes
No
E1-f. If a wheelchair lift is provided, does it meet the following?
Yes
No
f-i. Is the lift operational at the time of the survey?
[ADA Standards § 4.11.3]
Yes
No
f-ii. Is the change in level from the floor to the lift surface ramped or
beveled? [ADA Standards §§ 4.11.2, 4.5.2]
Yes
No
f-iii. Is there at least a 30-inch by 48-inch clear floor space on the
wheelchair lift? [ADA Standards §§ 4.11.2, 4.2.4]
Yes
No
f-iv. Does the lift allow a person using a mobility device unassisted
entry, operation (is key available, if required), and exit?
Yes
No
f-v. Are the controls and operating mechanisms mounted no more
than 54 inches above the floor for a side reach or 48 inches for a
forward reach? [ADA Standards §§ 4.11.2, 4.27.3]
Yes
No
f-vi. Are the controls and operating mechanisms usable with
one hand without tight grasping, pinching, or twisting?
[ADA Standards §§ 4.11.2, 4.27.4]
Yes
No
E1-g. At each location on the way to each shelter activity area where the
accessible route passes through a door, does at least one door meet the
following requirements?
Yes
No
g-i. Is the clear width for the door opening at least 32
inches measured when the door is open 90 degrees?
[ADA Standards §§ 4.1.3(7), 4.13.5]
Yes
No
g-ii. Is the door hardware (e.g., lever, pull, push, panic bar)
usable with one hand, without tight grasping, pinching, or
twisting of the wrist, to allow people who may not be able to
easily use one or both hands to fully operate the hardware?
[ADA Standards § 4.13.9]
Yes
No
g-iii. Is there clear maneuvering floor space in front of each accessible
door (see ADA Standards § Fig. 25) and, on the pull side, is there
at least 18 inches clear floor space beyond the latch side of the
door (see space configurations in Figure 25)?
[ADA Standards § 4.13.6]
Yes
No
 |
| A clear floor space on the latch side of the door (pull side) allows a person using a wheelchair or scooter to pull the door open and then enter. The size of the clear floor spacevaries depending on the direction of approach (shown by the arrows) and the door swing. |
g-iv. Is no more than 5 pounds force needed to push or pull open the
door? [ADA Standards § 4.13.11 (2)(b)]
Yes
No
Note: Fire doors are still considered to be accessible if they have the minimum opening force allowable by the appropriate administrative authority.
g-v. If the answers to questions g-ii thru g-iv are No, can the door be
propped open?
Yes
No
If an activity area is not on an accessible route and cannot be made accessible, find another
area that is on an accessible route where that activity may be provided.
2. Typical Issues for People Who are Blind or Have Low Vision
Individuals who are blind or have low vision may walk along any route or through
any shelter activity area, not just the accessible routes. That means any area
where people using the shelter can walk, including hallways, corridors, eating
areas, and sleeping areas, must be free of objects that cannot be detected by a
person who is blind or has low vision. Objects that are wall mounted, that project
into a pedestrian route from the side, or that are overhead must be located so
that individuals who are blind or have low vision will either detect the objects
before they run into them or safely pass under them. These routes must be free of
overhanging objects that are less than 80 inches above the floor and side objects
that protrude into the route more than 4 inches when the bottom of the object is
more than 27 inches above the floor. Items to watch for include wall-mounted fire
extinguishers and wall-mounted display cases when the bottom is more than 27
inches above the floor, wall sconces and light fixtures that protrude more than 4
inches off the wall, and open staircases, exit signs, overhead signs, banners, and
arched doorways that are lower than 80 inches above the floor.
 |
| Overhead and wall-mounted objects that may be
hazards along a pedestrian route |
Notes:
- Wall-mounted drinking fountains are a hazard when the front projects more than
4 inches beyond the wall and the bottom is more than 27 inches above the floor.
- Wall-mounted objects cannot project more than 4 inches beyond the wall if
the bottom is not in the cane-detectable area below 27 inches off the floor.
- Overhead objects must be at least 80 inches off the floor.
The following questions apply to pedestrian routes serving or leading to the shelter activity and common use
areas.
E2-a. Are pedestrian routes leading to or serving each service or activity area of
the shelter free of objects that protrude from the side more than 4 inches
into the route with the bottom of the object more than 27 inches above
the floor? [ADA Standards § 4.4.1]
Yes
No
Note: These objects may be wall mounted or free standing. Items to check include
wall-mounted fire extinguishers, light fixtures, coat hooks, shelves, drinking
fountains, and display cases.
E2-b. Are pedestrian routes leading to or serving each of the service or activity
areas free of overhead objects with the bottom edge lower than 80
inches above the floor? [ADA Standards § 4.4.2]
Yes
No
E2-c. Are any interior stairs along these
routes configured with a cane-detectable
warning or a barrier that prevents travel
into the area with less than an 80-inch high
head clearance so that people who
are blind or who have low vision cannot
hit their heads on the underside or stair
frame? [ADA Standards § 4.4.2]
Yes
No
If No, list the objects that are a hazard and their
location. Remove or relocate the object or place a
detectable object on the floor below each object to
remove the hazard.
|
| When the underside of a stair is open,
it is a hazard to people who are blind
or have low vision. Enclosing the area
below the stair or installing a cane detectable
barrier helps the person to
avoid the area. |
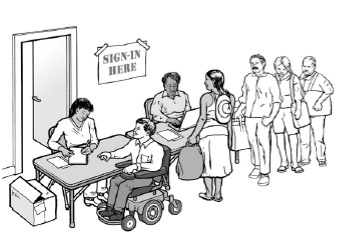
F. Check-In Areas
A shelter usually has one or more check-in areas
located near the entrance to the shelter. When
check-in areas are provided, then at least one
accessible check-in location should be provided.
The accessible check-in area should be at the
accessible entrance or signs should give directions
to the accessible check-in area.
If a permanent reception counter is used for check in,
make sure to provide a writing surface at an
accessible height for people who use a wheelchair,
scooter, or other mobility device. This may be a
part of the reception counter that is no higher than
36 inches above the floor, a folding shelf or an
adjacent table, or a clip board.
|
| An accessible check-in location using a folding table with a
height that people who use wheelchairs can easily reach. |
F1. Is there an accessible route that connects the accessible entrance to
areas that are likely to be used to register people as they arrive at the
shelter? [ADA Standards § 4.3]
Yes
No
F2. If there is a built-in reception or other type of counter, does it have a
section that is at least three feet long that is no higher than 36 inches
above the floor or is there a nearby surface that is not higher than 36
inches above the floor? [ADA Standards § 7.2]
Yes
No
Living at the Emergency Shelter
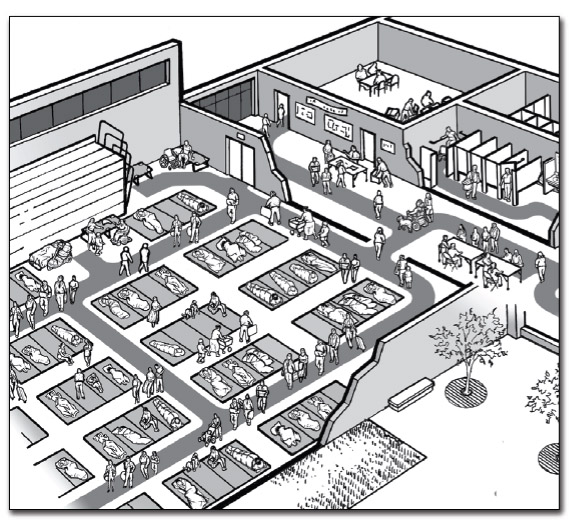
G. Sleeping Areas
Each accessible sleeping area needs to
be on an accessible route connecting it to
other activity areas in the shelter, including
toilet rooms and bathing areas. An
accessible route with adequate circulation
and maneuvering space provides access
in the sleeping areas for people who use
wheelchairs or scooters and this route serves
each accessible bed or cot.
 |
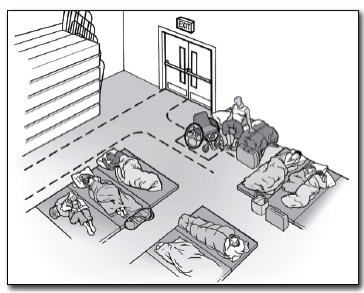
| Interior of one section of a shelter’s sleeping
area. The shaded pathway indicates the
accessible route, which provides access to
accessible beds, cots, and other activity areas
in the space plus the toilet rooms and other
activity areas in the shelter. |
Accessible cots have a sleeping surface at
approximately the same height above the floor as
the seat of a wheelchair (17 to 19 inches above
the floor). When placed in several sections of the
sleeping area, individuals who use a wheelchair,
scooter, or other mobility device will be able to
sleep near their family or other companions. An
accessible route is needed to provide access to
each accessible cot and a clear space at least 36
inches wide is needed along the side of the cot to
make it possible to transfer between the mobility
device and the cot. A preferred location for
accessible cots is to have one side against a wall.
This helps to stabilize the cot and the wall can act
as a backrest when the person sits up on the cot.
 |
| An accessible cot positioned against a wall. Dashed
lines indicate the accessible route and clear floor
space next to the cot. |
G1. Is there an accessible route, at least 36 inches wide, that connects each
sleeping area with other shelter activity areas?
Yes
No
Note: it may narrow to 32 inches wide for up to 2 feet in length.
[ADA Standards § 4.3.2(3)]
G2. Is the accessible route free of steps and abrupt level changes over 1/2 inch?
Yes
No
Note: level changes between 1/4 inch and 1/2 inch should be beveled). [ADA Standards §§ 4.1.3(1), 4.3.8]
Note: Although the facility survey cannot check the accessibility of the cots
because they will not be installed until the shelter is in use, planning for setting up
the sleeping area and for arranging the cots and mats should include providing
space for an accessible route and clear floor space at each accessible cot. Cots
used by people who are blind or who have low vision should be in an easily
locatable area.
H. Restrooms and Showers
At least one set of toilet rooms serving
the shelter must be accessible to
individuals who use a wheelchair,
scooter, or other mobility device. In
large shelters where more than one
set of toilet rooms is needed to serve
the occupants, it may be necessary to
provide additional accessible toilet
facilities or to establish policies to
assure that individuals with disabilities
have access to the accessible facilities.
 |
Interior of an accessible toilet room showing accessible route, clear
floor space at accessible fixtures, and the wide accessible toilet stall. |
H1. If a sign is provided at the toilet room entrance (e.g. Men, Women, Boys,
Girls, etc.), is a sign with raised characters and Braille mounted on the
wall adjacent to the latch? [ADA Standards § 4.30.6]
Yes
No
If No, install a sign with raised characters and Braille on the wall adjacent to the latch
side of the door and centered 60 inches above the floor and leave the existing sign in
place on the door if removing it will damage the door.
Note: an additional sign may be mounted on the toilet room door but this cannot be
considered to be the accessible sign which must be mounted on the wall adjacent to
the latch side of the door.
H2. Does the door to the toilet room provide at least 32 inches clear passage
width when the door is open 90 degrees? [ADA Standards § 4.13.5]
Yes
No
H3. Is the hardware (e.g., lever, pull, panic bar) usable with one hand without
tight grasping, pinching, or twisting of the wrist?
[ADA Standards § 4.13.9]
Yes
No
If No, can the door be propped open without compromising privacy, or can the
hardware be modified by adding new accessible hardware, or adapting or replacing
hardware?
H4. On the pull side of the door, is there at least 18 inches clearance provided
on the latch side if the door is not automatic or power-operated?
[ADA Standards § 4.13.6, Fig. 25]
Yes
No
H5. If there is a raised threshold, is it no higher than 3/4 inch at the door and
beveled on both sides? [ADA Standards §§ 4.1.6(3)(d)(ii), 4.13.8]
Yes
No
NA
If No, replace threshold with one with beveled sides or add a sloped insert.
H6. If the entry has a vestibule, is there a 30-inch by 48-inch clear floor space
inside the vestibule where a wheelchair or scooter user can be outside
the door swing? [ADA Standards § 4.13.7]
Yes
No
If No, possible solutions include leaving the inner door open or removing the outer
door.
H7. Inside the toilet room, is there an area where a person who uses a
wheelchair or other mobility device can turn around - either at least
60-inch diameter circle or a “T”-shaped turn area as shown in the figures
below? [ADA Standards §§ 4.22.3; 4.2.3]
Yes
No
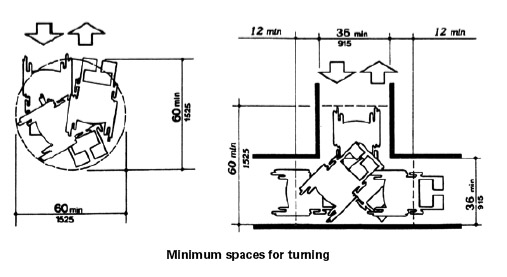 |
| Minimum spaces for turning |
H8. If lavatories are provided, does at least one have at least a 29 inch high
clearance under the front apron with the top of the rim no more than 34
inches above the floor? [ADA Standards § 4.19.2]
Yes
No
H9. Are the drain and hot water pipes for this lavatory insulated or otherwise
configured to protect against contact? [ADA Standards § 4.19.4]
Yes
No
H10. Does this lavatory have controls that operate easily with one
hand, without tight grasping, pinching, or twisting of the wrist?
[ADA Standards § 4.19.5]
Yes
No
H11. If mirrors are provided, is the bottom of the reflecting surface for the
mirror at this lavatory no higher than 40 inches above the floor or is a full
length mirror provided? [ADA Standards § 4.19.6]
Yes
No
H12. For at least one of each type of dispenser, receptacle, or equipment, is
there clear floor space at least 30 inches wide x 48 inches long adjacent
to the control or dispenser (positioned either parallel to the control or
dispenser or in front of it)?
[ADA Standards §§ 4.23.7; 4.27.2; 4.2.5 and Fig 5; 4.2.6 and Fig 6]
Yes
No
H13. Is the operating control (switch, lever, button, or pull) of at least one of
each type of dispenser or built-in equipment no higher than 54 inches
above the floor (if there is clear floor space for a parallel approach)
or 48 inches (if there is clear floor space for a front approach)?
[ADA Standards §§ 4.23.7; 4.27.3; 4.2.5 and Fig 5; 4.2.6 and Fig 6]
Yes
No
H14. Are all built-in dispensers, receptacles, or equipment mounted so
the front does not extend more than 4 inches from the wall if the
bottom edge is between 27 inches and 80 inches above the floor?
[ADA Standards §§ 4.23.7; 4.27; 4.4.1; Fig. 8]
Yes
No
Toilet Stalls
H15. Is at least one wide toilet stall
provided with an out swinging
door, side and rear grab bars,
and clear space next to the
toilet?
[ADA Standards § 4.17]
Yes
No
If No, check to see if another toilet
room provides a wide accessible
toilet stall, note its location for
shelter planners, and answer all toilet
room questions with respect to that
toilet room.
 |
| Overhead view of an individual using a
wheelchair positioned beside a toilet in a
wide accessible stall. |
H16. Is the toilet stall at least 60 inches wide and 56 inches deep
(wall mounted toilet) or 59 inches deep (floor mounted toilet)?
[ADA Standards § 4.17.3]
Yes
No
If No, note the width and depth of the stall. _________________
H17. Is at least 9 inches of toe clearance provided under the front wall and at
least one side wall of the toilet stall? [ADA Standards § 4.17.4]
Yes
No
H18. Is the centerline of the toilet 18 inches from the adjacent side wall?
[ADA Standards § 4.16.2; 4.17.3]
Yes
No
H19. Is the top of the toilet seat 17 inches to 19 inches above the floor?
[ADA Standards § 4.16.3]
Yes
No
H20. Is the flush valve located on the wide side adjacent to the lavatory or is
an automatic flush valve provided? [ADA Standards § 4.16.5]
Yes
No
H21. Is a horizontal grab bar at least 40 inches long securely mounted on
the adjacent side wall 33 to 36 inches above the floor with one end no
more than 12 inches from the back wall 33 to 36 inches above the floor?
[ADA Standards § 4.16.4; 4.17.6]
Yes
No
H22. Is a second horizontal grab bar at least 36 inches long securely mounted
on the back wall with one end no more than 6 inches from the side wall
33 to 36 inches above the floor? [ADA Standards § 4.16.4; 4.17.6]
Yes
No
H23. Is the door to the toilet stall located diagonally opposite, not directly in
front of, the toilet or on the opposite side wall from the wall with the
long grab bar? [ADA Standards § 4.17.3]
Yes
No
H24. Unless the wide stall is
located at the end of a
row of toilet stalls,
does the door to this
wider stall open out?
[ADA Standards § 4.17.3]
Yes
No
 |
| Plan views showing minimum sizes of wide
accessible toilet stall |
H25. Is the clear width of the door at least 32 inches (measured between the
face of the door and the edge of the opening) when the door is open 90
degrees? [ADA Standards § 4.13.5]
Yes
No
H26. If there are 6 or more stalls in the restroom, is one of those stalls (in
addition to the wider stall noted above) exactly 36 inches wide with an
out swinging stall door that provides at least 32 inches of clear width?
[ADA Standards § 4.22.4]
Yes
No
H27. Does this 36-inch wide stall have horizontal grab bars on both of the side
partitions that are at least 36 inches long and 33 to 36 inches above the
floor? [ADA Standards § 4.22.4]
Yes
No
H28. Is the surface of the toilet seat in this 36-inch-wide stall 17 to 19 inches
above the floor? [ADA Standards §§ 4.16.3; 4.22.4]
Yes
No
H29. If a coat hook is provided is it mounted no higher than 54 inches above
the floor for a side approach or 48 inches above the floor for a front
approach? [ADA Standards § 4.25.3]
Yes
No
Note:
For many emergency shelters, evacuees are not expected to use shower or bathing facilities due to the short period they may stay at the
shelter. If planning for the shelter operation includes offering shower or bathing facilities, then those facilities should be on an accessible
route and checked for accessibility. For information on the requirements for accessible showers or bathtubs see the ADA Standards for
Accessible Design which is available online at www.ada.gov.
The following are figures illustrating some accessible shower features from the ADA Standards.
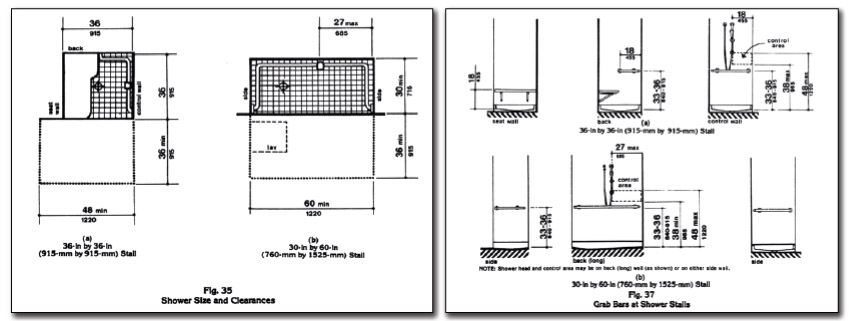 |
Accessible Shower Stall
Minimum Size and Clearances |
Accessible Shower Stall Grab Bars
and Seat, Shower, and Control Area |
I. Public Telephones
When public telephones are provided, then one or more accessible public telephones should be provided in areas
serving shelter activity and service areas. Whenever accessible telephones are provided, each should be on an
accessible route. In shelters it is common to provide additional telephones on tables or desks and some of these
telephones should be accessible.
A text telephone (also commonly known as a TTY) is a device that allows individuals who are deaf or hard
of hearing or who have a speech disability to communicate over a telephone. Having at least one TTY in any
building that has at least four pay phones, provides access for people who are deaf or hard of hearing.
I1. If at least one public telephone or one bank of telephones is provided,
does at least one of each type of telephone (e.g., pay telephone,
intercom telephone, other telephone) have the following?
Yes
No
I1a. For a side approach (clear floor space at least 30 inches long x 48
inches wide), is the coin slot no higher than 54 inches above the
floor? [ADA Standards § 4.31.2, Fig. 44 (a)]
Yes
No
I1b. For a front approach (where clear floor space at least 30 inches
wide x 48 inches long), is the coin slot no higher than 48 inches
above the floor? [ADA Standards § 4.31.2, Fig. 44 (b)]
Yes
No
I2. Does the phone have volume controls? [ADA Standards § 4.31.5]
Yes
No
I3. If three or more telephones are located in one bank serving the shelter,
are a shelf and an electrical outlet provided at one telephone for use of a
portable TTY? [ADA Standards § 4.31.9 (2)]
Yes
No
I4. If four or more pay telephones are provided on the site, is there a TTY
(text telephone) provided at the shelter?
Yes
No
If yes, location_______________
I5. Is there a sign at each pay phone or pay phone bank for the shelter
directing people to the nearest TTY? [ADA Standards § 4.30.7 (3);
4.31.9(3)]
Yes
No
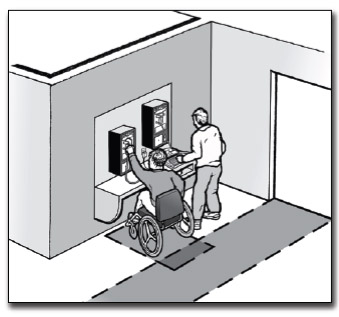 |
| A bank of two public telephones. The accessible
telephone is on the left and the telephone on the
right is equipped with a TTY. |
J. Drinking Fountains
Approximately 50% of the drinking fountains serving the shelter must be accessible and located on an accessible
route. Accessible drinking fountains must have enough space for a person using a wheelchair, scooter, or other
mobility device to use the drinking fountain. The spout and controls of the drinking fountain must be near the
front edge. The controls must be usable with one hand without tight grasping, pinching, or twisting of the wrist.
The other 50% of drinking fountains serving the shelter must be configured for use by people who have difficulty
bending or stooping while standing.
When an object, such as a drinking fountain, protrudes more than four inches into the circulation path, the bottom
edge must be at 27 inches above the floor or lower so the drinking fountain is not a hazard to people who are blind
or have low vision.
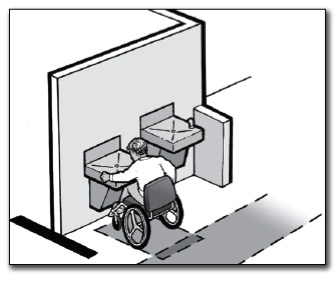 |
A person who uses a wheelchair is drinking from an
accessible drinking fountain. Beside the accessible
drinking fountain is a standard height fountain that
is usable by people who have difficulty bending or
stooping. The short wall beside the standard height
drinking fountain is cane-detectable to guide people who
are blind or have low vision away from the standard
height fountain which, otherwise, would be a protruding
object hazard. |
The following questions apply to 50% of the drinking fountains that are provided.
J1. If the drinking fountain is a wall-mounted unit, is there clear floor space
at least 30 inches wide (36 inches if it is in an alcove) x 48 inches long
in front of the drinking fountain and at least 27 inches high under the
fountain so that a person using a wheelchair can get close to the spout
and controls? [ADA Standards § 4.15.5 (1), Figs. 4 (e) and 27 (b)]
Yes
No
J2. If the drinking fountain is a floor-mounted unit, is there clear floor space
at least 30 inches long x 48 inches wide (60 inches if it is in an alcove)
for a side approach to the drinking fountain so that a person using a
wheelchair can get close to the spout and controls even though the
fountain has no clear space under it?
[ADA Standards § 4.15.5 (2), Figs. 4 (e), 27 (c) and (d)]
Yes
No
J3. Is the top of the spout no higher than 36 inches above the floor and at
the front of the fountain or water cooler? [ADA Standards § 4.15.2]
Yes
No
J4. Does the water rise at least 4 inches high when no more than
5 pounds of force is applied to the controls of the fountain?
[ADA Standards §§ 4.15.3 and 4.15.4]
Yes
No
J5. Are the controls on or near the front of the unit and do they operate
with one hand without tight grasping, pinching, or twisting of the wrist?
[ADA Standards § 4.15.4]
Yes
No
J6. Is the bottom of the apron of the fountain 27 inches above the
floor so that it provides the space needed for a person who uses
a wheelchair to pull up under it but is not a hazard to people who
are blind or have low vision and use a cane to detect hazards?
[ADA Standards §§ 4.15.5 (1) and 4.4.1]
Yes
No
K. Eating Areas
An accessible route, at least 36 inches wide and without steps or steep slopes, must be
provided to and throughout the food service and eating areas of the shelter. The accessible
route allows people who use wheelchairs, scooters, and other mobility devices to get to all
of the food and drink items in the shelter and to accessible tables and seating.
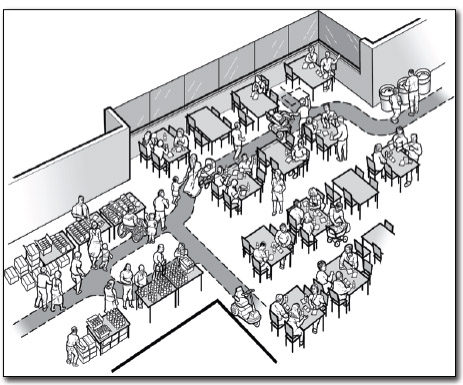 |
A serving and eating area in a shelter are shown above. The shaded pathway
illustrates the accessible route connecting the entrance, serving areas,
accessible seats and tables, and the exit. |
K1. Is there an accessible route, at least 36 inches wide, that connects each
of the shelter activity areas with the food service and eating areas (it
may narrow to 32 inches wide for up to 2 feet in length)?
[ADA Standards § 4.3.2(3)]
Yes
No
K2. Is there an accessible route that is at least 36 inches wide that connects
accessible tables with serving, condiment, and dispenser areas?
[ADA Standards § 5.3; 4.3.8]
Yes
No
K3. In each eating area, if tables with fixed seats are provided, do at least
5% of each type of table with fixed seats have accessible locations
with knee space at least 27 inches high, at least 19 inches deep, and at
least 30 inches wide with a table top 28 to 34 inches above the floor?
[ADA Standards § 5.1]
Yes
No
Note: If movable tables and chairs are used as shown, then locate at least 5% of the
tables adjacent to an accessible route. Tables can be relocated as needed during
operation of the shelter.
K4. If built-in food, drink, condiment, and tableware dispensers are provided,
are dispensers and operating controls mounted no higher than 54 inches
above the floor if clear floor space is provided for a side approach?
[ADA Standards § 5.5]
Yes
No
K5. If the operating controls are set back 10 to 24 inches from the front edge
of the counter or table are they no higher than 46 inches above the floor?
[ADA Standards § 5.5]
Yes
No
K6. If food service lines are provided, is an accessible route provided (at
least 36 inches wide) and are the tray slides no higher than 34 inches
above the floor? [ADA Standards § 5.5]
Yes
No
Other Issues
L. Availability of Electrical Power
Emergency shelters should have a way to provide a back-up power supply when the electrical service is
interrupted. The back-up power is needed to provide refrigeration of medicines, operation of supplemental
oxygen and breathing devices, and for charging the batteries of power wheelchairs and scooters. Individuals
whose medications (certain types of insulin, for example) require constant refrigeration need to know if a shelter
provides supplemental power for refrigerators or ice-packed coolers. Individuals who use medical support
systems, such as supplemental oxygen, or who require periodic breathing treatments using powered devices rely
on a stable source of electricity. These individuals
must have access to electric power from a generator
or other source of electricity while at a shelter.
In general, in each community or area where a
shelter is provided, a facility must have one or more
back-up generators or other sources of electricity so
that evacuees with a disability who rely on powered
devices can have access to electrical power while at
the shelter.
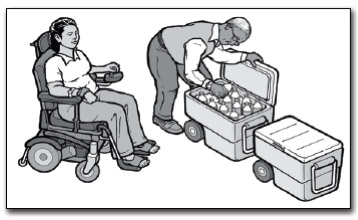
L1. Is there a backup source of electrical power for the facility?
Yes
No
L2. Is there a refrigerator or other equipment, such as coolers with a good supply of ice, at the shelter?
Yes
No
M. Single-User or “Family” Toilet Room
In many schools and large facilities where emergency shelters are often located, single-user toilet rooms may
be provided for staff. In those facilities built or altered since the ADA went into effect, single-user toilet rooms
should have accessible features that could be useful during shelter operation. These features include an accessible
entrance and turning and maneuvering spaces. These rooms should also have been built to allow grab bars,
accessible controls, and accessible hardware to be easily installed.
As part of the planning for operating an emergency shelter, facilities operators should consider using an available
staff toilet room, if provided, as a single-user or “family” toilet room. When provided in addition to large
accessible toilet rooms, this type of facility permits a person with a disability to receive assistance from a person
of the opposite sex.
M1. If a sign is provided at the toilet room entrance (e.g. Men, Women, Boys,
Girls, etc.), is a sign with raised characters and Braille mounted on the
wall adjacent to the latch side of the door and centered 60 inches above
the floor? [ADA Standards § 4.1.3(16)(a)]
Yes
No
If No, install a sign with raised characters and Braille on the wall adjacent to the latch
side of the door and centered 60 inches above the floor and leave the existing sign in
place on the door if removing it will damage the door.
Note: an additional sign may be mounted on the toilet room door but this cannot be
considered to be the accessible sign which must be mounted on the wall adjacent to
the latch side of the door.
M2. Does the door to the toilet room provide at least 32 inches clear passage
width when the door is open 90 degrees? [ADA Standards § 4.13.5]
Yes
No
M3. Is the hardware (e.g., lever, pull, etc.) usable with one hand without tight
grasping, pinching, or twisting of the wrist? [ADA Standards § 4.13.9]
Yes
No
If No, add new accessible hardware or adapt/replace hardware.
M4. On the latch, pull side of the door, is there at least 18 inches
clearance provided if the door is not automatic or power operated?
[ADA Standards § 4.13.6; Fig. 25]
Yes
No
M5. If there is a raised threshold, is it no higher than 3/4 inch at the door and
beveled on both sides? [ADA Standards §§ 4.1.6(3)(d)(ii); 4.13.8]
Yes
No
If No, replace threshold with one with beveled sides or add a sloped insert.
M6. Inside the room is there an area for a person who uses a wheelchair to
turn around - either a 60-inch diameter circle or a “T”-shaped turn area?
[ADA Standards §§ 4.22.3; 4.2.3]
Yes
No
M7. If the door swings into the room, does the door swing not
overlap the required clear floor space for the toilet or lavatory?
[ADA Standards §§ 4.22.2; 4.2.4.1]
Yes
No
Note: In the figure below the clear floor space for the toilet extends at least 66
inches from the back wall.
 |
| Plan view showing the minimum amount
of space required between the toilet and
the adjacent lavatory. |
M8. Is there at least 18 inches
between the center of the toilet
and the side of the adjacent
lavatory?
[ADA Standards § 4.16.2; Fig.
28]
Yes
No
M9. Does the lavatory have at least
a 29-inch-high clearance under
the front edge and the top of
the rim no more than 34 inches
above the floor?
[ADA Standards § 4.19.2]
Yes
No
 |
Plan view of a single-user toilet room showing the door swing not overlapping
the dark toned area indicating the clear floor space for the toilet and lavatory.
The door swing may overlap the turning space indicated by the circular area. |
Notes:
- 48-inch minimum by
66-inch minimum clear
floor space for toilet
- 48-inch minimum by
30-inch minimum clear
floor space for lavatory
- 60-inch minimum
turning space
- door swing
M10. Are the drain and hot water pipes for the lavatory insulated or otherwise
configured to protect against contact?
[ADA Standards § 4.19.4]
Yes
No
M11. Does that lavatory have controls that operate easily with one hand,
without tight grasping, pinching, or twisting of the wrist?
[ADA Standards § 4.19.5]
Yes
No
M12. If a mirror is provided, is the bottom of
the reflecting surface no higher than 40
inches above the floor or is a full length
mirror provided?
[ADA Standards § 4.19.6]
Yes
No
M13. For each type of dispenser, receptacle,
or equipment, is there clear floor space
at least 30 inches wide x 48 inches long
adjacent to the control or dispenser
(positioned either parallel to the control
or dispenser or in front of it)?
[ADA Standards §§ 4.23.7; 4.27.2; 4.2.5 and Fig. 5; 4.2.6 and Fig. 6]
Yes
No
 |
| ront view of toilet, lavatory,
mirror and soap dispenser |
M14. Is the operating control (switch, lever,
button, or pull) for each type of dispenser
or built-in equipment no higher than 54 inches above the floor (if there
is clear floor space for a parallel approach) or 48 inches (if there is clear
floor space for a front approach)?
[ADA Standards §§ 4.23.7; 4.27.3; 4.2.5 and Fig. 5; 4.2.6 and Fig. 6]
Yes
No
M15. Are all built-in dispensers, receptacles, or equipment mounted so the
front does not extend more than 4 inches from the wall if the bottom
edge is between 27 inches and 80 inches above the floor?
[ADA Standards §§ 4.23.7; 4.27; 4.4.1; Fig. 8]
Yes
No
M16. Is the centerline of the toilet 18 inches from the adjacent side wall?
[ADA Standards §§ 4.16.2; 4.17.3]
Yes
No
M17. Is the top of the toilet seat 17 to 19 inches above the floor?
[ADA Standards § 4.16.3]
Yes
No
M18. Is the flush valve located on the side adjacent to the lavatory?
[ADA Standards § 4.16.5]
Yes
No
M19. Is a horizontal grab bar at least 40 inches long securely mounted on
the adjacent side wall 33 to 36 inches above the floor with one end no
more than 12 inches from the back wall?
[ADA Standards §§ 4.16.4; 4.17.6]
Yes
No
M20. Is there a horizontal grab bar at least 36 inches long securely mounted
behind the toilet 33 to 36 inches above the floor with one end no more
than 6 inches from the side wall? [ADA Standards §§ 4.16.4; 4.17.6]
Yes
No
M21. If a coat hook is provided, is it mounted no higher than 54 inches
above the floor for a side approach or 48 inches above the floor for a
front approach? [ADA Standards § 4.25.3]
Yes
No
N. Health Units/Medical Care Areas
In many schools, where emergency shelters
are often located, nurses' rooms or other types
of health care facilities may be provided.
These health care facilities should be on
an accessible route and have accessible
features, including an accessible entrance,
an accessible route to the different types of
services offered within the medical care unit,
turning and maneuvering spaces, and cots or
beds that are at a height to which people who
use mobility devices can easily transfer.
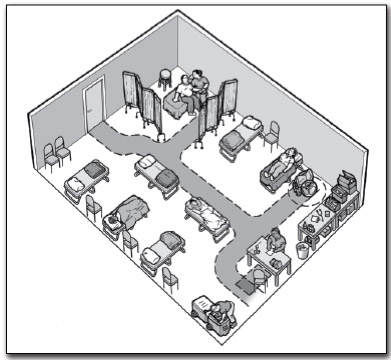 |
| An overhead view of a medical care area with a shaded pathway
showing the accessible route shown and clear floor spaces. |
N1. Is there an accessible route, at least 36 inches wide, that connects
each of the shelter activity areas with the health units and medical
care areas (it may narrow to 32 inches wide for up to 2 feet in length)?
[ADA Standards § 4.3.2(3)]
Yes
No
O. Accessible Portable Toilets
Portable toilets are often used at emergency shelters to supplement permanent
toilet facilities. When portable toilets are provided, at least one must be a unit
with accessible features that is located on an accessible route connecting it with
the shelter. For the entrance to an accessible portable toilet to be usable, there
must either be no step or a ramp must be installed that extends extends from the
hinge side of the door to at least 18 inches beyond the latch side of the door.
Accessible portable toilets should similar features to a standard accessible toilet
stall including an accessible door, side and rear grab bar, clear space next to the
toilet, and maneuvering space.
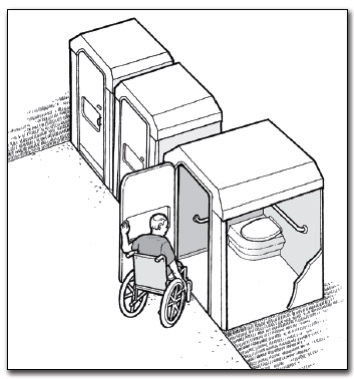 |
| A person using a wheelchair enters an accessible
portable toilet. The unit is positioned to provide a level entry from the accessible route. |
The Americans with Disabilities Act authorizes the Department of Justice (the Department) to provide technical assistance to individuals and entities that have rights or responsibilities under the Act. This document provides informal guidance to assist you in understanding the ADA and the Department's regulations.
This guidance document is not intended to be a final agency action, has no legally binding effect, and may be rescinded or modified in the Department's complete discretion, in accordance with applicable laws. The Department's guidance documents, including this guidance, do not establish legally enforceable responsibilities beyond what is required by the terms of the applicable statutes, regulations, or binding judicial precedent.
ADA Tool Kit for State and Local Governments
December 14, 2010